 RetailOS · Barcodes & Labels Manual
RetailOS — Barcodes & Labels Manual
A hands-on guide to designing and printing product labels: building a label layout, arranging the fields, adding barcodes and prices, and lining the print up exactly with your pre-cut label sheets or a continuous roll.
Base URL:https://goretailos.comBarcodes & Labels:/admin/labels· Products & variants:/admin/productsThis is the label-focused companion to the full User Manual, the POS Manual and the Usage Guide.
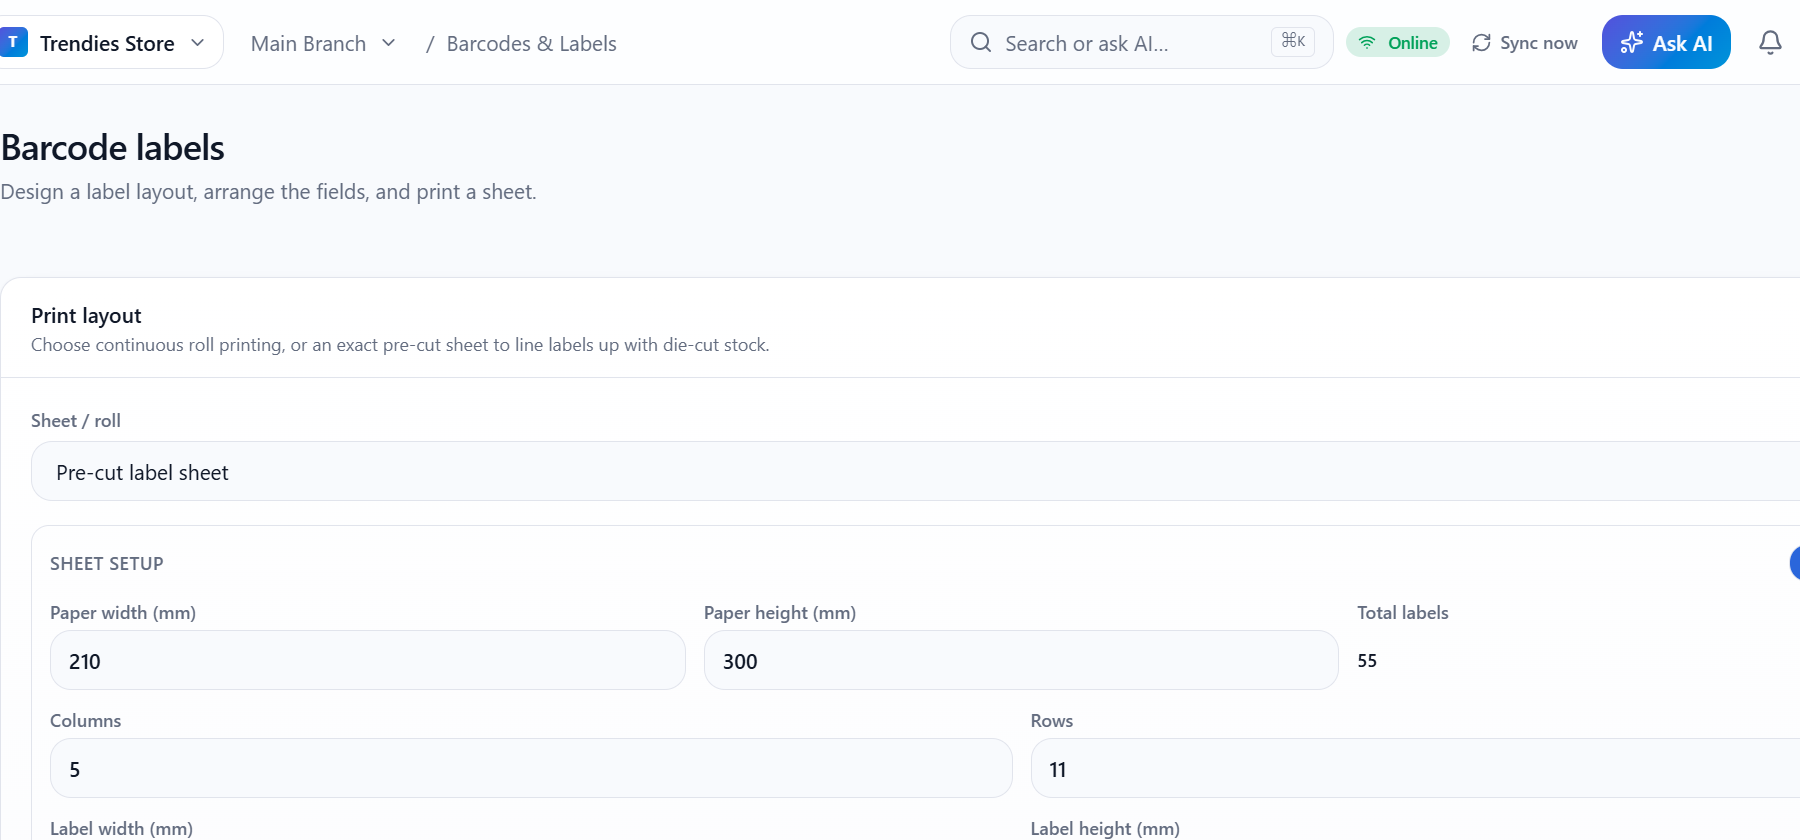
1. What the label designer is, and who can use it
The Barcodes & Labels screen (Catalog → Barcodes & Labels, /admin/labels) is where you:
- design a reusable label layout (which fields show, in what order, how they're aligned and sized);
- choose the paper — a continuous roll, or an exact pre-cut label sheet measured to your die-cut stock;
- pick the products to print and how many copies of each;
- print a sheet (or roll) that lands dead-centre on the labels.
Everything you design is saved as a template on your shop, so it syncs across devices and is there next time.
- Designing & printing is available to any admin user who can open the screen.
- Saving a design (the Save design button) is limited to Owner, Admin and Manager roles. Other roles can still tweak and print in the moment, but can't persist changes to the shared template.
Barcodes come from your products. Labels print the primary barcode already stored on each variant. If a variant has no barcode, its label prints "No barcode" — add or generate one first in Products & variants. The label screen never invents a barcode.
2. Templates — save a layout once, reuse it forever
A template bundles a whole label design: the label size, the fields and their formatting, the print layout, the pre-cut sheet geometry, and the start/calibration settings. You can keep as many as you like — e.g. one for clothing tags, one for shelf labels, one for a specific sheet you buy.
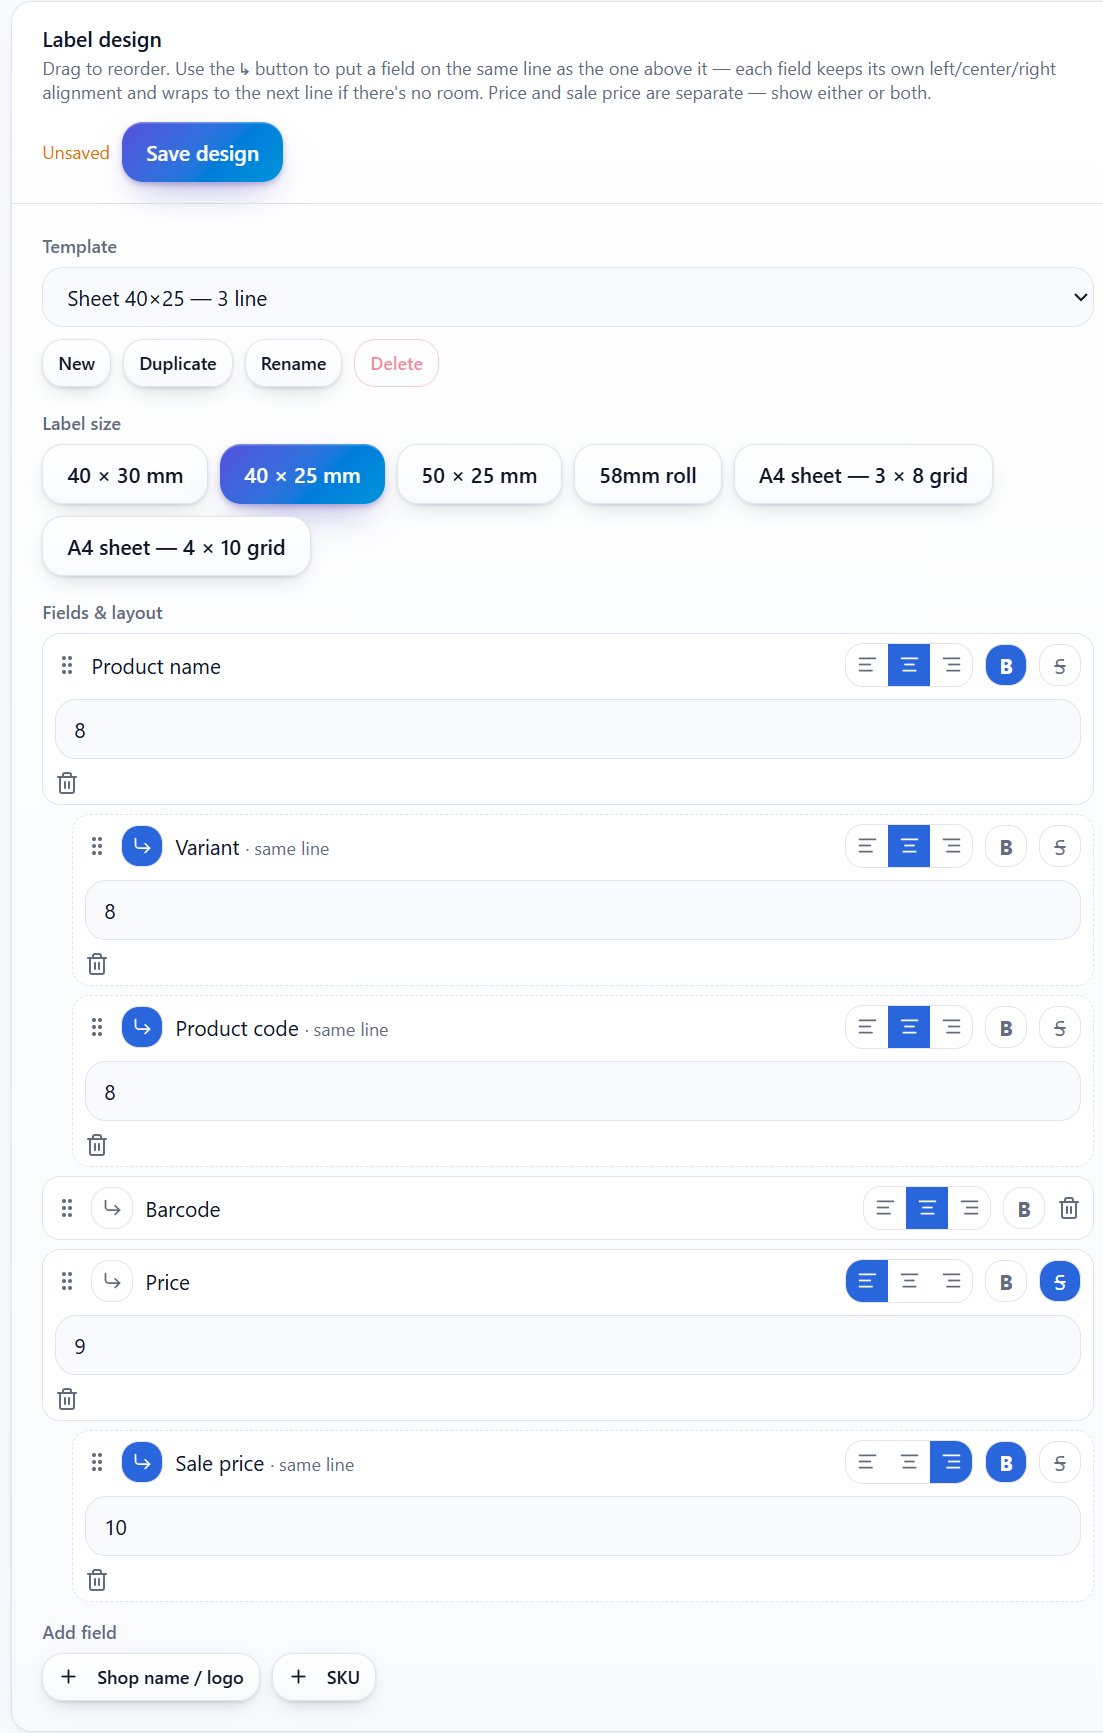
The template controls sit at the top of the Label design panel:
| Button | What it does |
|---|---|
| Template (dropdown) | Switch the active template. The whole screen — fields, size, layout, sheet setup — follows it. |
| New | Start a fresh template with the default fields. |
| Duplicate | Copy the current template (including its sheet geometry and calibration) as a starting point. |
| Rename | Give the template a clear name. |
| Delete | Remove it. You must always keep at least one template. |
- An Unsaved flag appears the moment you change anything. Press Save design to persist it to the shop.
- Switching templates or hitting Delete does not auto-save — use Save design to keep your changes.
Save is per shop, not per device. Once saved, the template is available on every till and computer signed into the shop.
3. Label size
Pick the physical label you're designing for from the Label size row:
- 40 × 30 mm, 40 × 25 mm, 50 × 25 mm — common thermal / sticker sizes.
- 58 mm roll — a wide continuous roll.
- A4 sheet — 3 × 8 grid and A4 sheet — 4 × 10 grid — Avery-style office label sheets.
The label size sets the design canvas and the size used for continuous / roll printing. (When you print on a pre-cut label sheet, the printed cell size comes from the Label width / height you enter in Sheet setup — see §6 — so the sheet's own measurements always win.)
4. Fields & layout — arrange what prints on the label
The Fields & layout list is the label itself, top to bottom. Each row is one field with its own controls.
Available fields: Shop name / logo · Product name · Variant · Product code · SKU · Barcode · Price · Sale price.
Adding, removing and reordering
- Add field — buttons under the list add any field not already used.
- Remove — the trash icon on a row removes that field.
- Reorder — drag the grip handle (⁝⁝) to move a field up or down. Order = print order, top to bottom.
Putting two fields on one line
By default every field prints on its own line. Use the ↳ (same line) button to tuck a field up onto the line above it:
- Grouped fields keep their own alignment — one can sit left, another centre, another right on the same line. This is exactly how a Price (left) · Sale price (right) line is built.
- If the grouped fields are too wide for the label, they wrap to the next row automatically.
- The first field is always a line start (there's nothing above it to join).
Per-field formatting
| Control | Effect |
|---|---|
| Align (▮ ▬ ▮) | Left, centre or right within its line/zone. |
| B (bold) | Bold the text. |
| S (strikethrough) | Cross the text out. On the Price field this only shows as a struck-out "old price" when the item has an active sale price — non-sale items never print a crossed-out price. |
| Font size (px) | The text size, 6–48 px. |
Barcode is special. The Barcode row has no strike or font-size control — the barcode graphic is sized automatically so it stays scannable.
Price vs. Sale price
Price and Sale price are two separate fields — show either, both, or neither:
- Price prints the regular price. Tick S on it to render it struck-through as an "old price" (only when a sale is active).
- Sale price prints only when the variant has an active sale price that is lower than the regular price. No active sale → the Sale price field prints nothing.
5. Print layout — roll vs. pre-cut sheet
The Print layout panel chooses how labels flow onto paper.
- Continuous / roll (auto-fill) — labels flow one after another and pack onto the page automatically. Best for thermal label rolls.
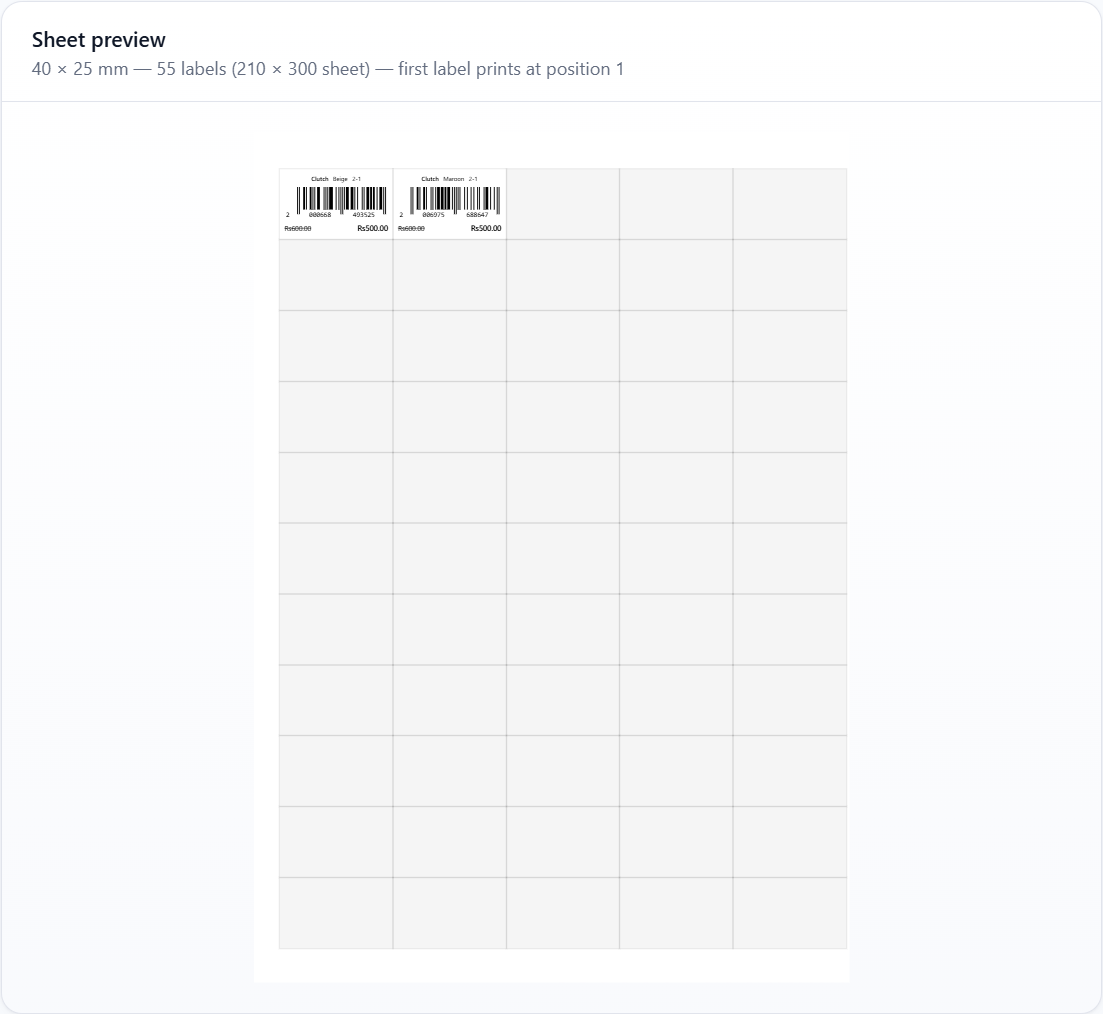
- Pre-cut label sheet — an exact physical grid that matches die-cut sticker sheets (e.g. a 210 × 300 mm sheet of 55 labels). Every measurement is honoured in millimetres so labels land centred on the pre-cut stock.
Choosing Pre-cut label sheet reveals the Sheet setup form (next section).
6. Sheet setup — describe your sheet with a ruler
This is the important part for pre-cut sheets: measure your actual sheet with a ruler and type the numbers in. Nothing here is hardcoded — any sheet you can buy can be described.
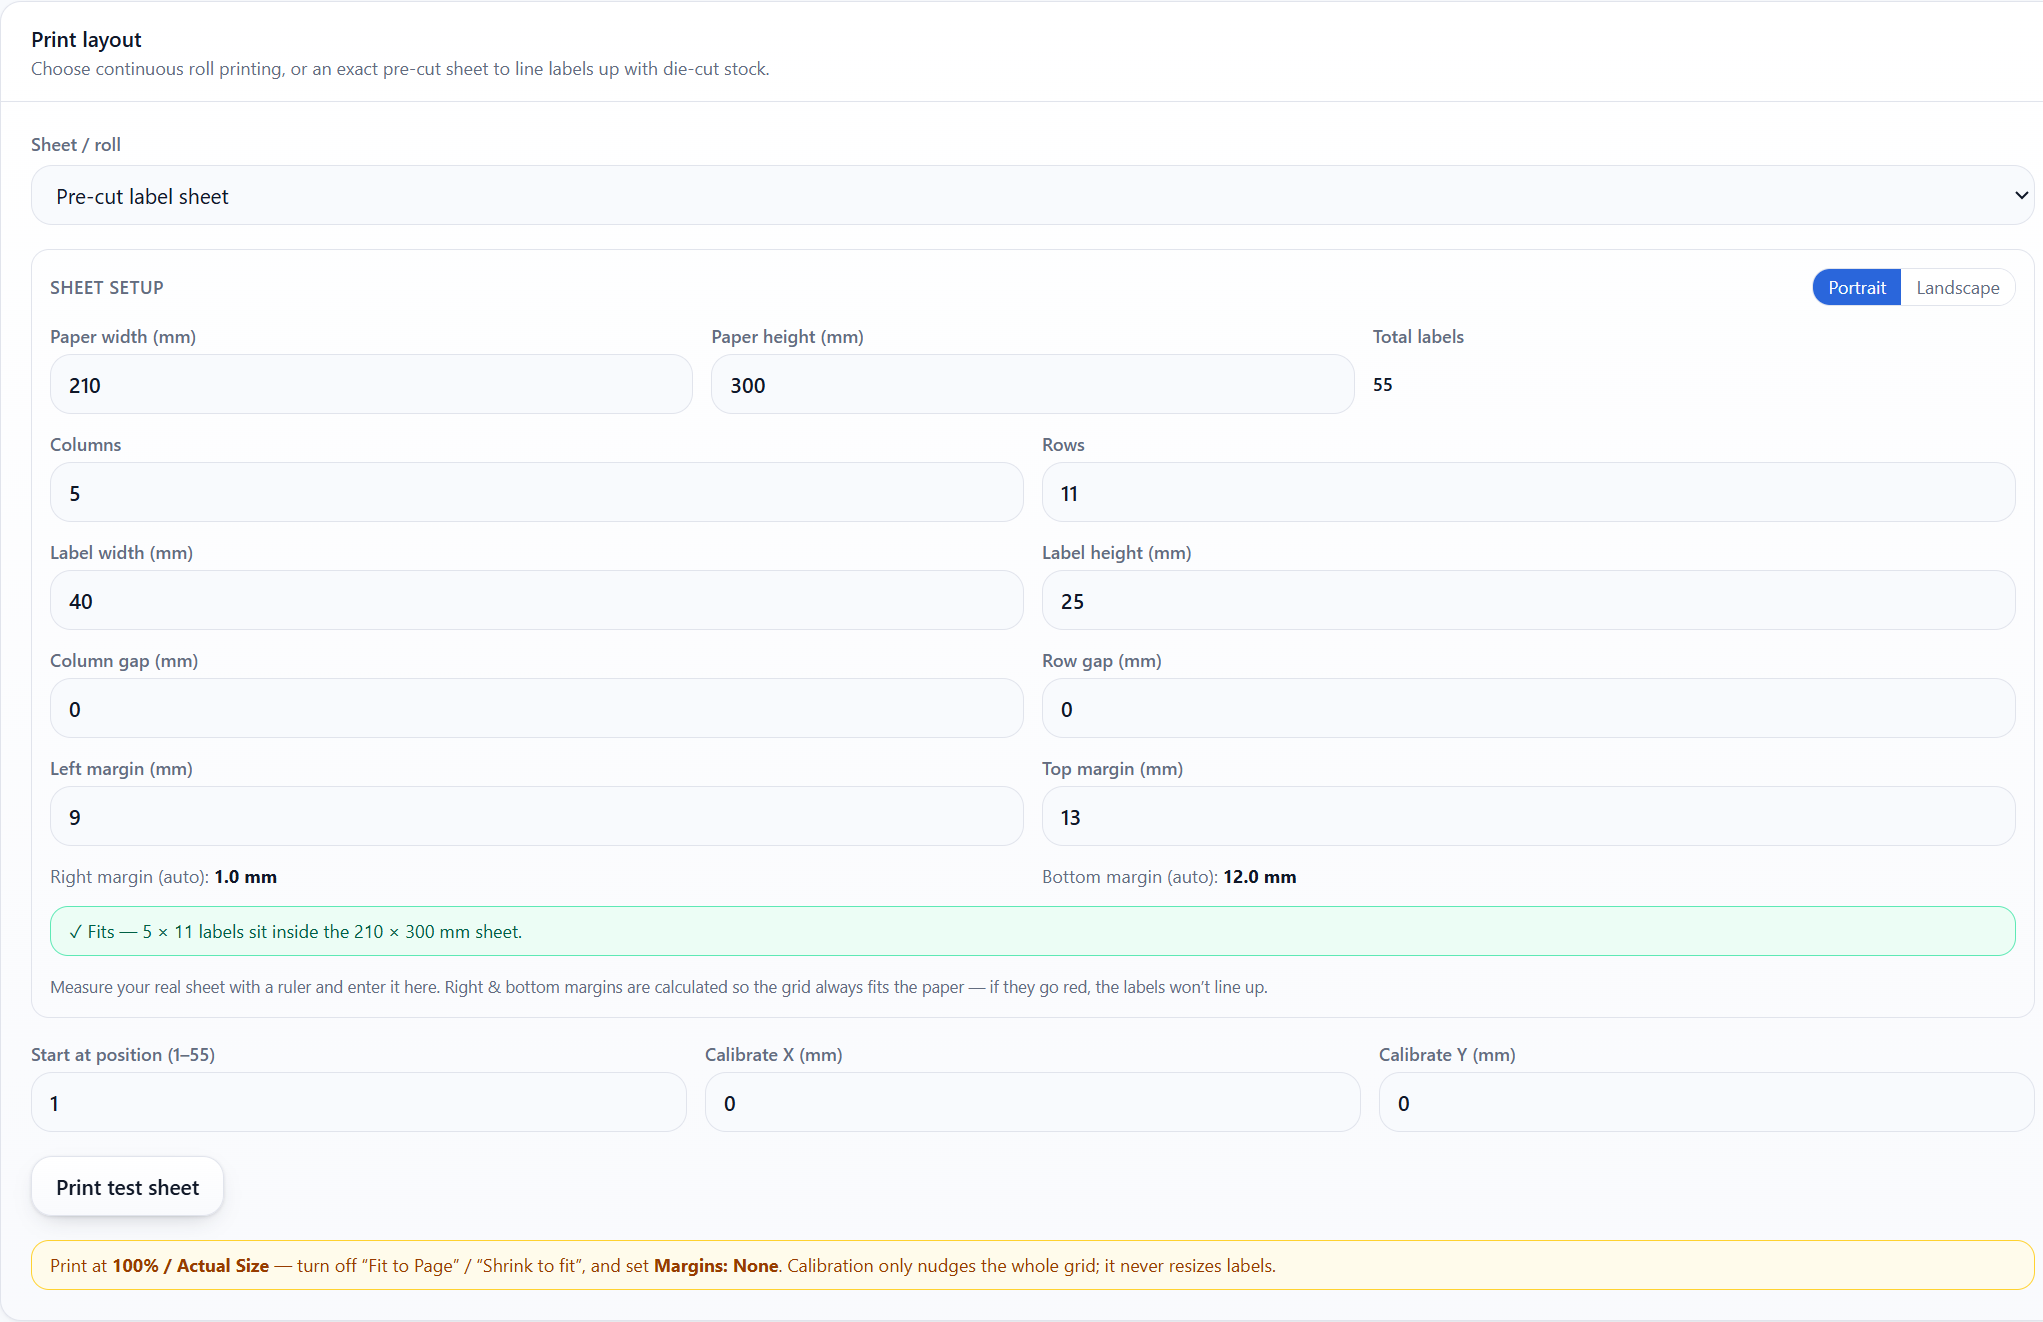
Fill it in top to bottom:
| Field | What to enter |
|---|---|
| Portrait / Landscape | Orientation of the paper. Switching swaps width and height. |
| Paper width / height (mm) | The full sheet size (e.g. 210 × 300 mm). |
| Columns / Rows | How many labels across and down. |
| Total labels | Shown automatically = Columns × Rows. |
| Label width / height (mm) | The size of one label cell. |
| Column gap / Row gap (mm) | The space between labels. Usually 0 on butt-cut sheets. |
| Left margin / Top margin (mm) | The blank border from the paper's top-left edge to the first label. |
Right & bottom margins are calculated for you
You only enter Left and Top. The app computes Right margin (auto) and Bottom margin (auto) live, because on a grid the left margin + labels + gaps + right margin must add up to the paper width (and likewise top-to-bottom). This makes contradictory numbers impossible.
A banner tells you whether it all fits:
- ✓ Fits (green) — the grid sits inside the paper. You're good to print.
- ✗ Labels overflow the paper by X mm (red) — the columns/rows are wider or taller than the paper. Reduce a margin, a gap, the label size, or the column/row count until it turns green.
Rule of thumb: if the right or bottom margin goes negative (red), your labels won't line up — the maths says they run off the edge. Fix it before printing.
7. Start position, calibration & the test sheet
Under Sheet setup you fine-tune where printing lands:
- Start at position (1–N) — the first label prints into this cell. Use it to reuse a partly-used sheet: if the first two labels are gone, start at position 3.
- Calibrate X / Y (mm) — nudge the whole grid left/right or up/down to compensate for a printer that feeds slightly off. Calibration moves the grid; it never resizes the labels. Reset calibration appears once you've nudged it.
- Print test sheet — prints thin outlines of every label position on plain paper. Hold it against your real sheet to confirm alignment before wasting sticker stock.
Print at 100%
In your browser's print dialog, print at 100% / Actual Size — turn off "Fit to Page" / "Shrink to fit" and set Margins: None. Fit-to-page silently rescales the sheet and throws every label off. Calibration can only shift the grid; it can't undo a scaling change.
8. Choosing products, previewing & printing
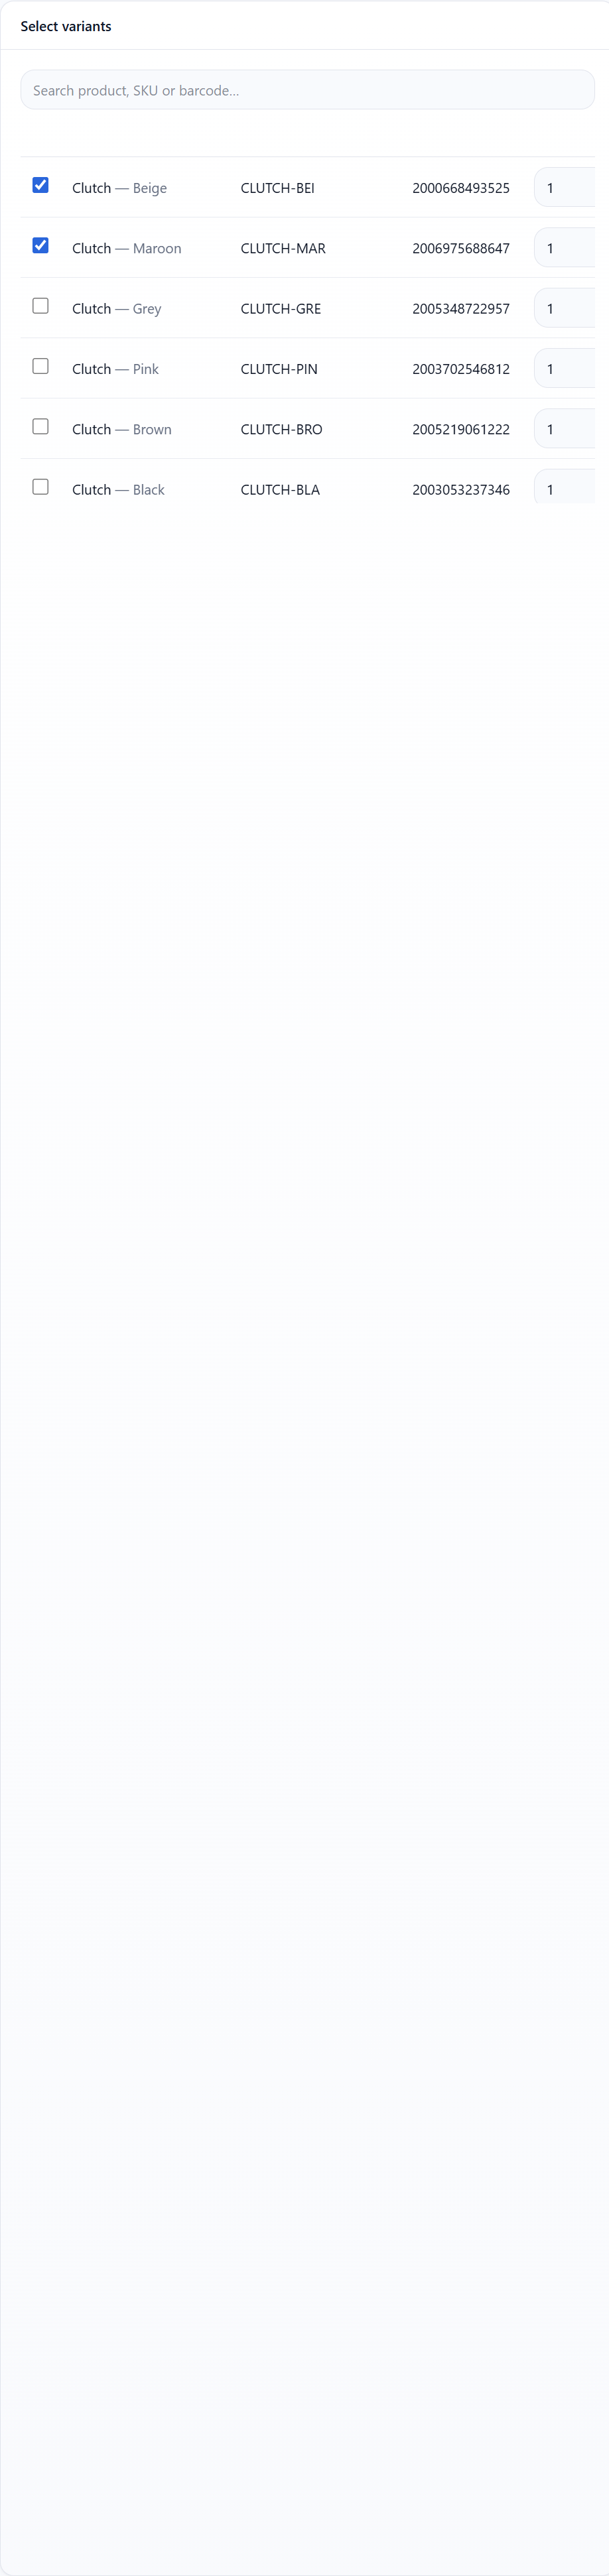
- In Select variants, search by product name, SKU or barcode and tick the items you want.
- Set Copies per row for how many labels of that item to print.
- The Preview panel shows the first labels exactly as they'll print.
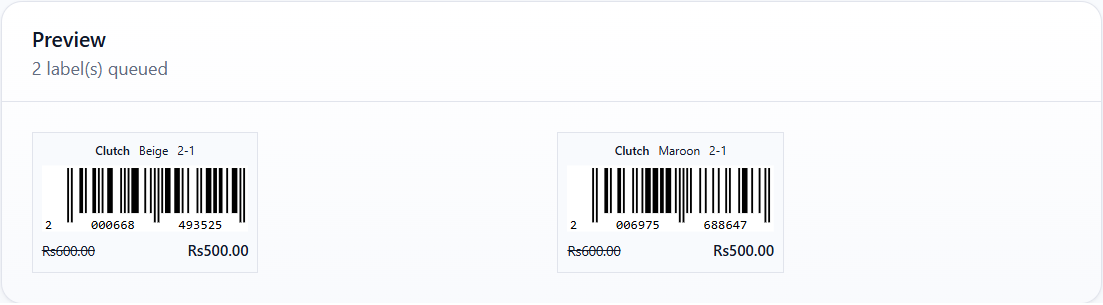
- On a pre-cut sheet, the Sheet preview shows the whole page — where each label lands, the start position, and how many sheets the run needs.
- Press Print (…) at the top. The button shows how many labels — and, on a sheet, how many sheets — will print.
Blank cells (before your start position, or on a partly-filled last sheet) simply print empty, so a reused sheet stays aligned.
9. Editing a template as JSON
Power users (and support) can view or edit the whole active template as JSON — the label design (size, fields) and page design (layout, start position, calibration and the full sheet geometry) together.
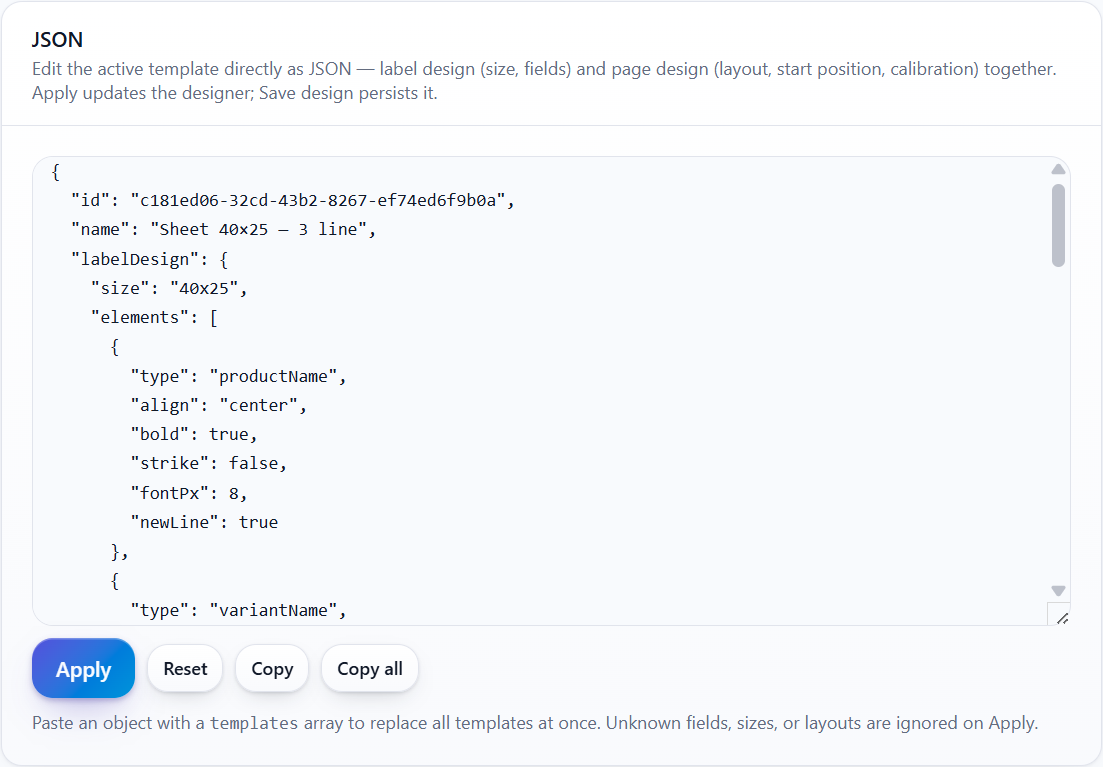
- Apply — loads the JSON into the designer (review it, then Save design to persist).
- Reset — discards your JSON edits and re-shows the current template.
- Copy — copies this template's JSON; Copy all copies every template.
- Paste an object with a top-level
templatesarray to replace all templates at once. - Anything invalid — unknown fields, bad sizes/layouts, garbled geometry — is safely ignored or corrected on Apply; it never breaks the grid.
10. Troubleshooting
| Problem | What to do |
|---|---|
| Labels print off-centre / misaligned | Re-measure the sheet with a ruler and check every Sheet setup value. Print at 100% / Actual Size, Margins: None. Use Calibrate X / Y to nudge, and Print test sheet to confirm. |
| Red "labels overflow the paper" banner | The grid is bigger than the paper. Reduce a margin, a gap, the label size, or the column/row count until it turns green. |
| Right / bottom margin looks wrong | It's calculated, not typed. It changes when you edit paper size, columns/rows, label size, gaps or the left/top margin — adjust those. |
| Barcode prints "No barcode" | That variant has no barcode. Add or generate one in Products & variants. |
| Sale price doesn't show | The item has no active sale price, or the sale price isn't lower than the regular price. |
| Struck-through (old) price doesn't show | The Price field only strikes through when the item has an active sale price to mark down from. |
| Second label won't sit on the same line | Use the ↳ (same line) button on that field, and give the two fields different alignments (e.g. left + right). Fields wrap if the label is too narrow. |
| Save design is greyed out | Nothing has changed (no Unsaved flag), or your role can't save — saving needs Owner / Admin / Manager. |
| A product isn't in the list | Search by product / SKU / barcode. Only catalog variants appear here. |
| Fonts too big or small | Adjust each field's font size (px). The barcode is sized automatically and has no font control. |
This page renders LABELS_MANUAL.md. See also the full User Manual, the POS Manual and the Usage Guide.